
HOW TO MIX
Note: You only need to mix once per peptide vial
1. Get Ready
Materials Needed
- Peptide Vial (powdered)
- Vial of Bacteriostatic Water
- Reconstitution Syringe (10mL)
- Alcohol wipes
- Large needle
Preparation Checklist
- Reconstitution amount (use calculator below)
- Clean, flat surface
- Soap & water
- Sharps container
Your medication arrives in a powdered form. To use it, you will mix it with bacteriostatic water. This process is called reconstitution, a.k.a. mixing.
2. Calculate Mix
Open the dropdown and select one
3. Mix Your Peptide

Instructions
Prepare your area
- Wash your hands with soap and water
- Set everything on a clean, flat surface
- Wipe the tops of both vials with an alcohol wipe. Let them dry
Prepare the syringe
- Take the syringe out of its packaging
- Attach the large needle by pressing it onto the syringe and twisting to secure
- Remove the needle cap, keep handy
Draw bacteriostatic water
- Insert the needle into the vial of bacteriostatic water
- Turn the vial upside down so the vial is above the syringe
- Slowly pull the plunger down to your prescribed amount (use calculator)
- Pull the needle straight out
Inject into peptide vial
- Insert the needle straight into the peptide vial
- Slowly press the plunger to add the water
- If you feel resistance, pause
- Let pressure release naturally, then continue slowly
- Push until all liquid has been transferred.
- Remove the needle
Dispose and finish
- Carefully recap the needle
- Place the syringe and needle into a sharps container
- Swirl the vial until the peptide is fully dissolved
Storage
- Store your peptide in the fridge
- Keep it upright and sealed
- Do not freeze
- Use only within the timeframe provided with your prescription
Tips
- Let alcohol dry fully before inserting a needle
- Keep the needle steady and straight to avoid bending
- If bubbles form, pause and allow them to settle before continuing
- Take your time. Slow is correct
Important
- Use only the exact amount of water specified for your prescription
- Always inject slowly to avoid pressure buildup
- Never reuse needles or syringes
- If anything looks cloudy, discolored, or unusual, do not use
HOW TO INJECT
1. Get Ready
Materials Needed
- Peptide vial (reconstituted)
- Injection syringe
- Alcohol wipes
- Sharps container
Preparation Checklist
- Dosage instructions (use calculator above)
- Clean, flat surface
- Soap & water
- Sharps container
2. Choose Your Injection Site
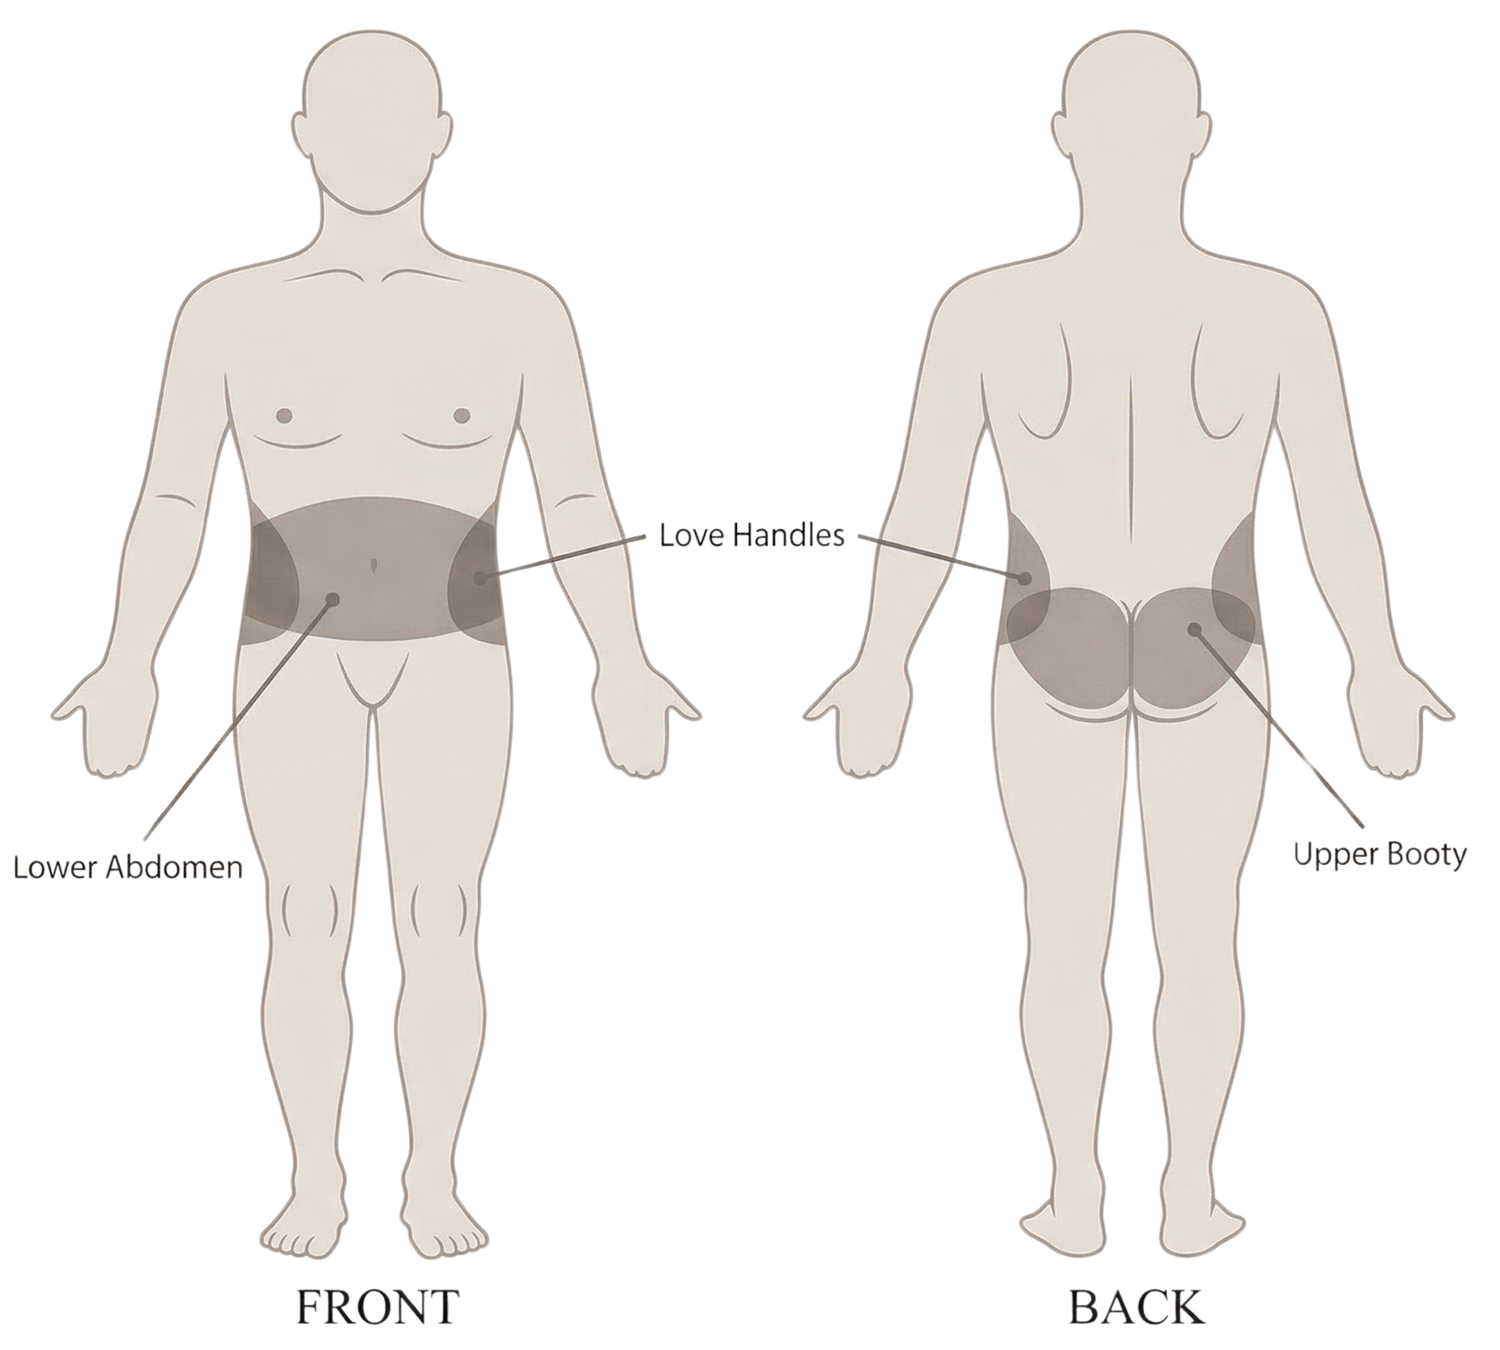
Injection Areas
Choose a new location (not previously injected):
- Lower abdomen, avoiding the area two inches around the navel
- Love handles
- Upper glutes
Certain peptides (e.g. BPC-157) may be injected closer to an injury site only if advised.
3. Inject Your Peptide

Instructions
Prepare your area
- Wash your hands with soap and water
- Set everything on a clean, flat surface
- Wipe the top of your peptide vial with an alcohol wipe and let it dry
Prepare the syringe
- Remove the bottom needle cap, discard
- Remove the top needle cap, keep handy
Draw your dose
- Insert the needle into the vial
- Turn the vial upside down so the vial is above the syringe
- Pull the plunger down past your prescribed dose
- Slowly pull the plunger back up to your prescribed dose
- Pull the needle straight out
Choose your injection site
- Insert the needle straight into the skin
- Slowly press the plunger down until all medication is delivered
- Pull the needle straight out
Dispose and finish
- Carefully recap the needle
- Lightly massage the injection area for a few seconds
- Place the syringe into a sharps container
Storage
- Store your peptide in the fridge
- Keep it upright and sealed
- Do not freeze
- Use only within the timeframe provided with your prescription
For Stacks (2+ Peptides)
- Do not inject multiple peptides into the exact same location
- Inject right and left of each area to spread the shots out
Pro Tips
- Let alcohol fully dry before injecting
- Going slightly past your dose and dialing back helps accuracy
- Keep your hand steady and insert the needle in one smooth motion
Important
- Always use a new syringe for each injection
- Never inject through clothing
- Inject slowly to reduce irritation
- Rotate injection sites
- Alternate left and right sides

Trouble Shooting & FAQs
I have redness or slight swelling after injecting - is that normal?
Mild redness or swelling is common and should resolve within a few hours. If it worsens or you notice significant swelling, trouble breathing, or dizziness, seek medical care and contact your provider.
I see a small air bubble in the syringe - is that okay?
Yes. Small bubbles are not harmful for subcutaneous injections. Tap lightly and push out if needed, then proceed.
Can I travel with my peptides?
Yes. Use a travel-friendly insulin cooler to keep your peptides cool. We can provide a travel letter upon request for security or customs.
What if I see a drop of blood after injecting?
This can happen and is not a concern. Apply light pressure with clean gauze and continue as normal.
Why does it sting or burn when I inject?
Mild stinging can occur. Inject slowly and rotate sites. If sharp or persistent, reassess technique or needle.
What if I left my peptide out of the fridge?
If left out briefly, it is usually fine. If exposed to heat or left out overnight, do not use and contact your provider.
Can I reuse needles or syringes?
No. Always use a new sterile needle and syringe for each injection to reduce risk and ensure accuracy.
How do I reorder?
Text our main line to request a refill: +1(323) 987-6644


